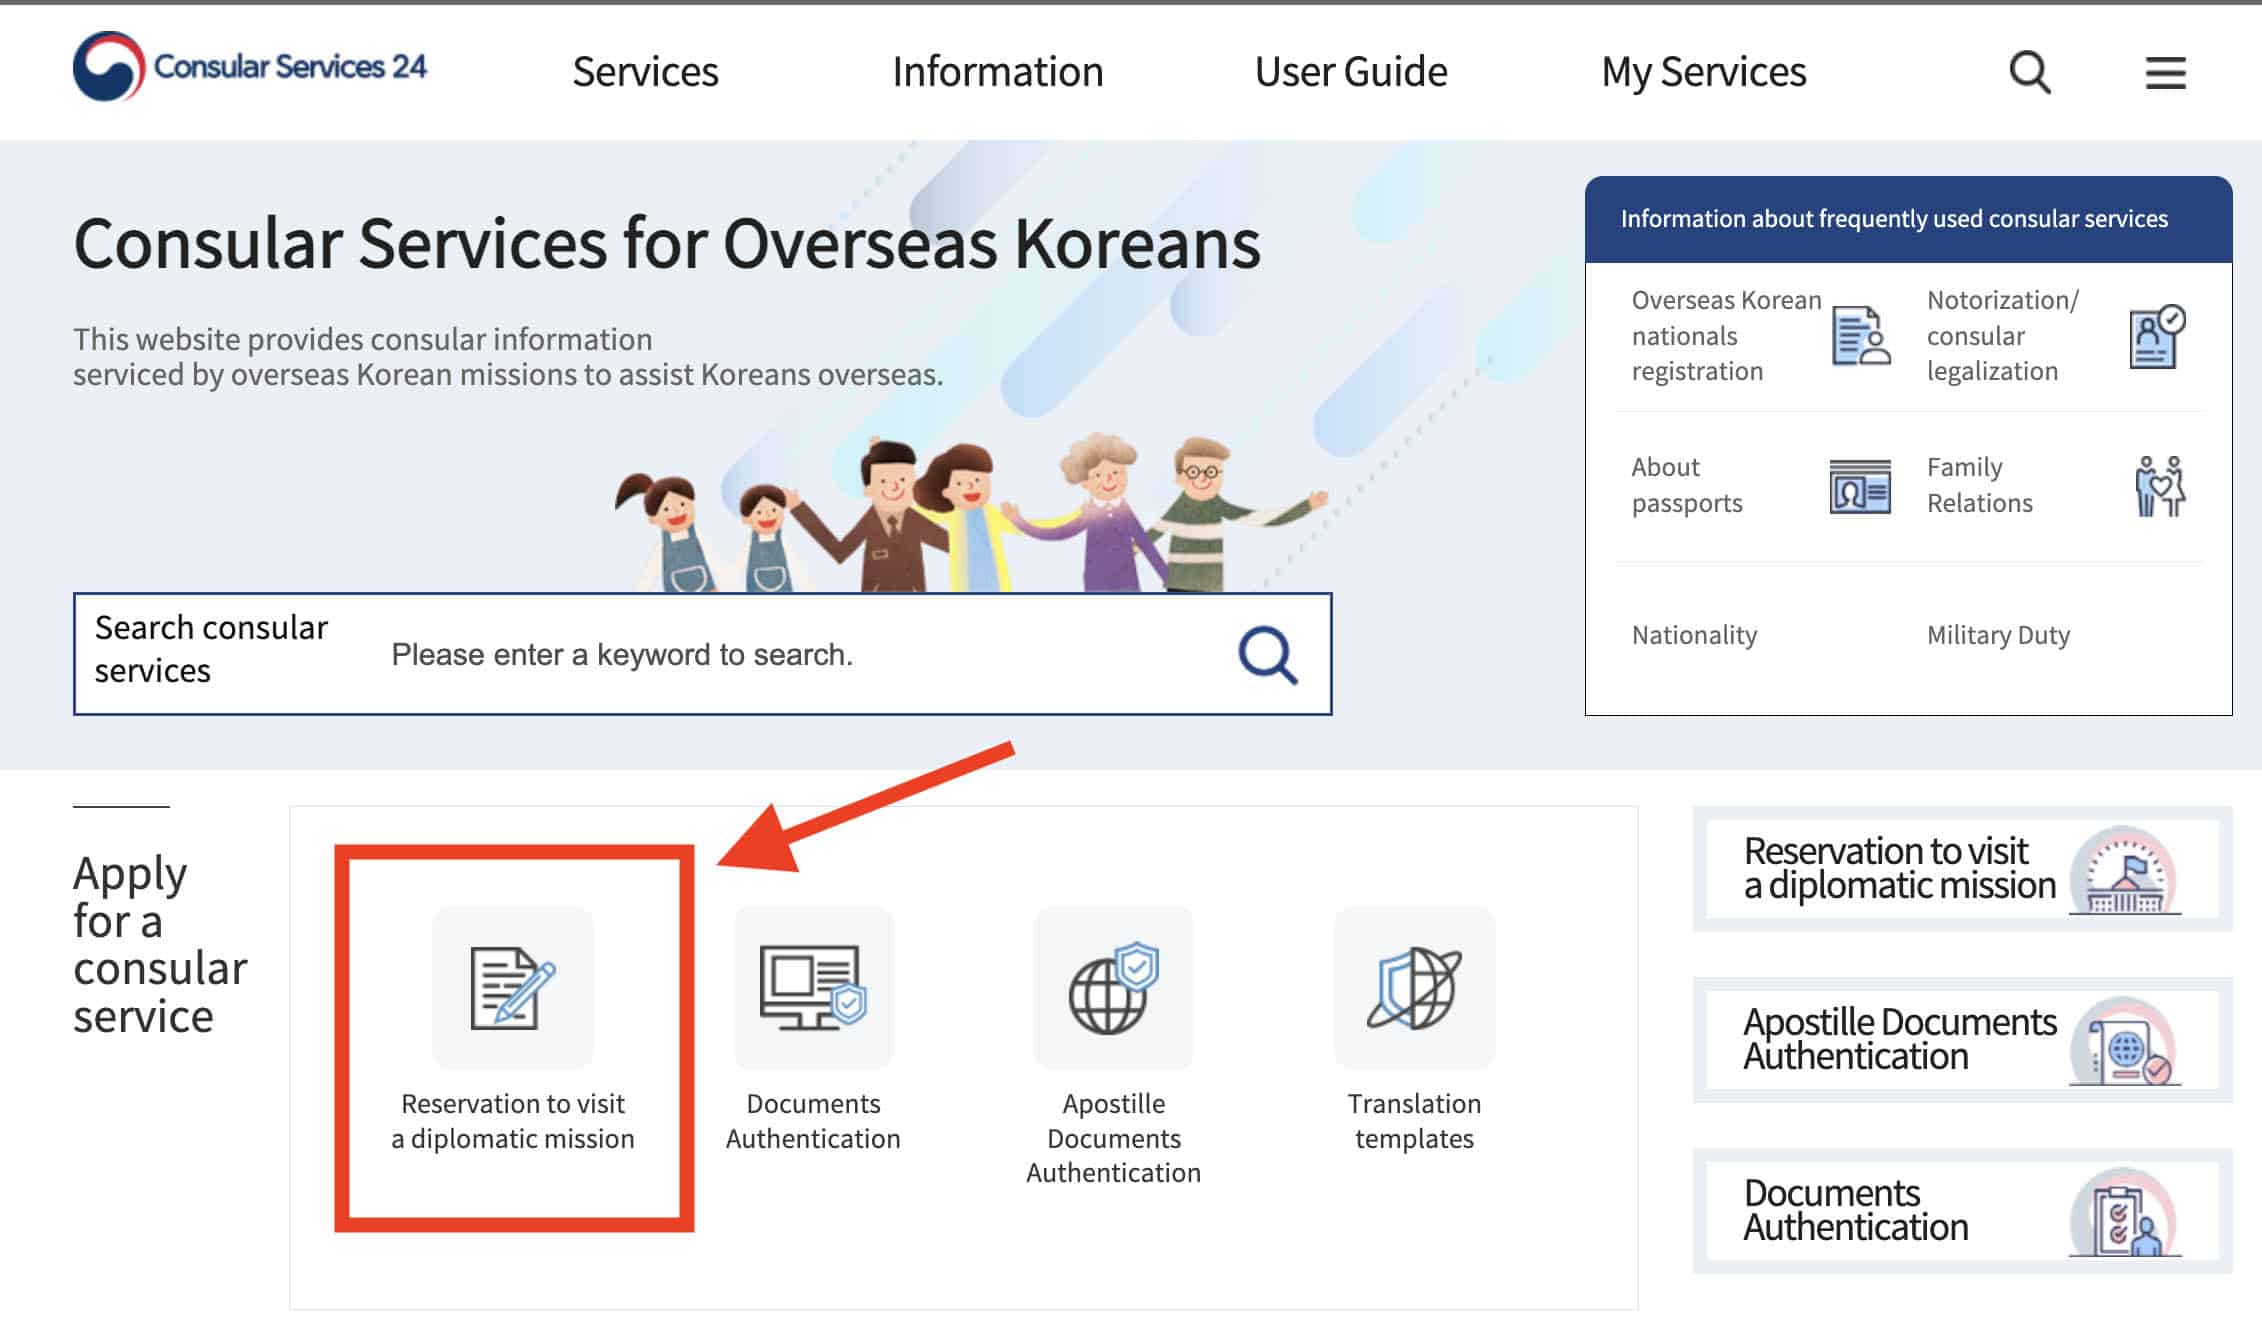
1. Visit the Korean Embassy’s Consular Services website.
You can find it at https://consul.mofa.go.kr/en/main.do.
Under the APPLY FOR A CONSULAR SERVICE tab, click on RESERVATION TO VISIT A DIPLOMATIC MISSION. It’s the first button under this tab.
2. Fill out the non-membership log-in form.
On the next page, a pop up will appear: Please log in as a non-member to access this service. Click OK. Then, follow these steps.
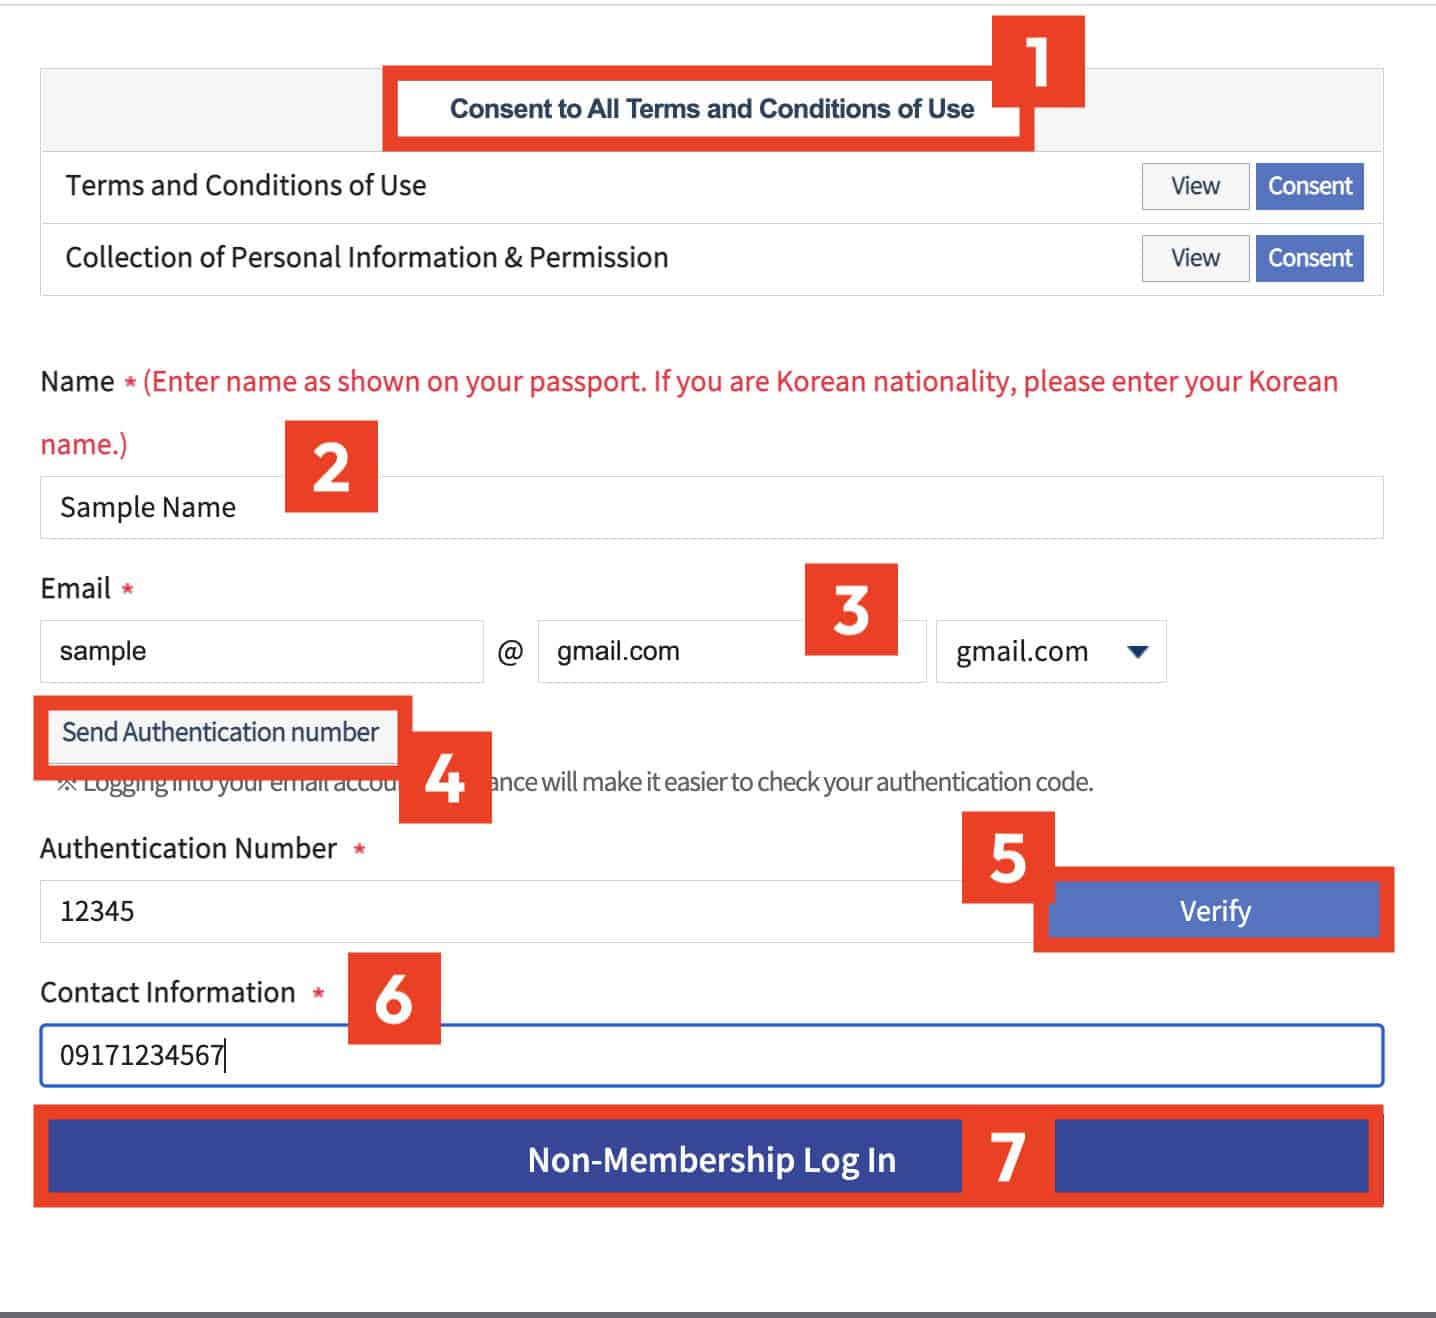
- On the log-in form, click on the CONSENT TO ALL TERMS & CONDITIONS OF USE button. It will display the terms. Read and scroll down, and then click CONFIRM.
- Enter your name as indicated on the passport that you will use.
- Enter your email address.
- Click SEND AUTHENTICATION NUMBER. The system will send a code to the email address you just entered. It usually takes a minute or so, but at peak times, it can take as long as 30 minutes.
- Enter the authentication number you received and click VERIFY.
- Under contact information, enter your phone or mobile number.
- Click NON-MEMBERSHIP LOG IN.
3. Choose the embassy and service type.
Before you reach this type, you might be redirected first to a virtual “waiting room”, depending on how heavy the visitor traffic is at the time. The page will show you how much time (in seconds) you need to wait before it takes you to the reservation page.
Once on the Reservation page, choose the following:
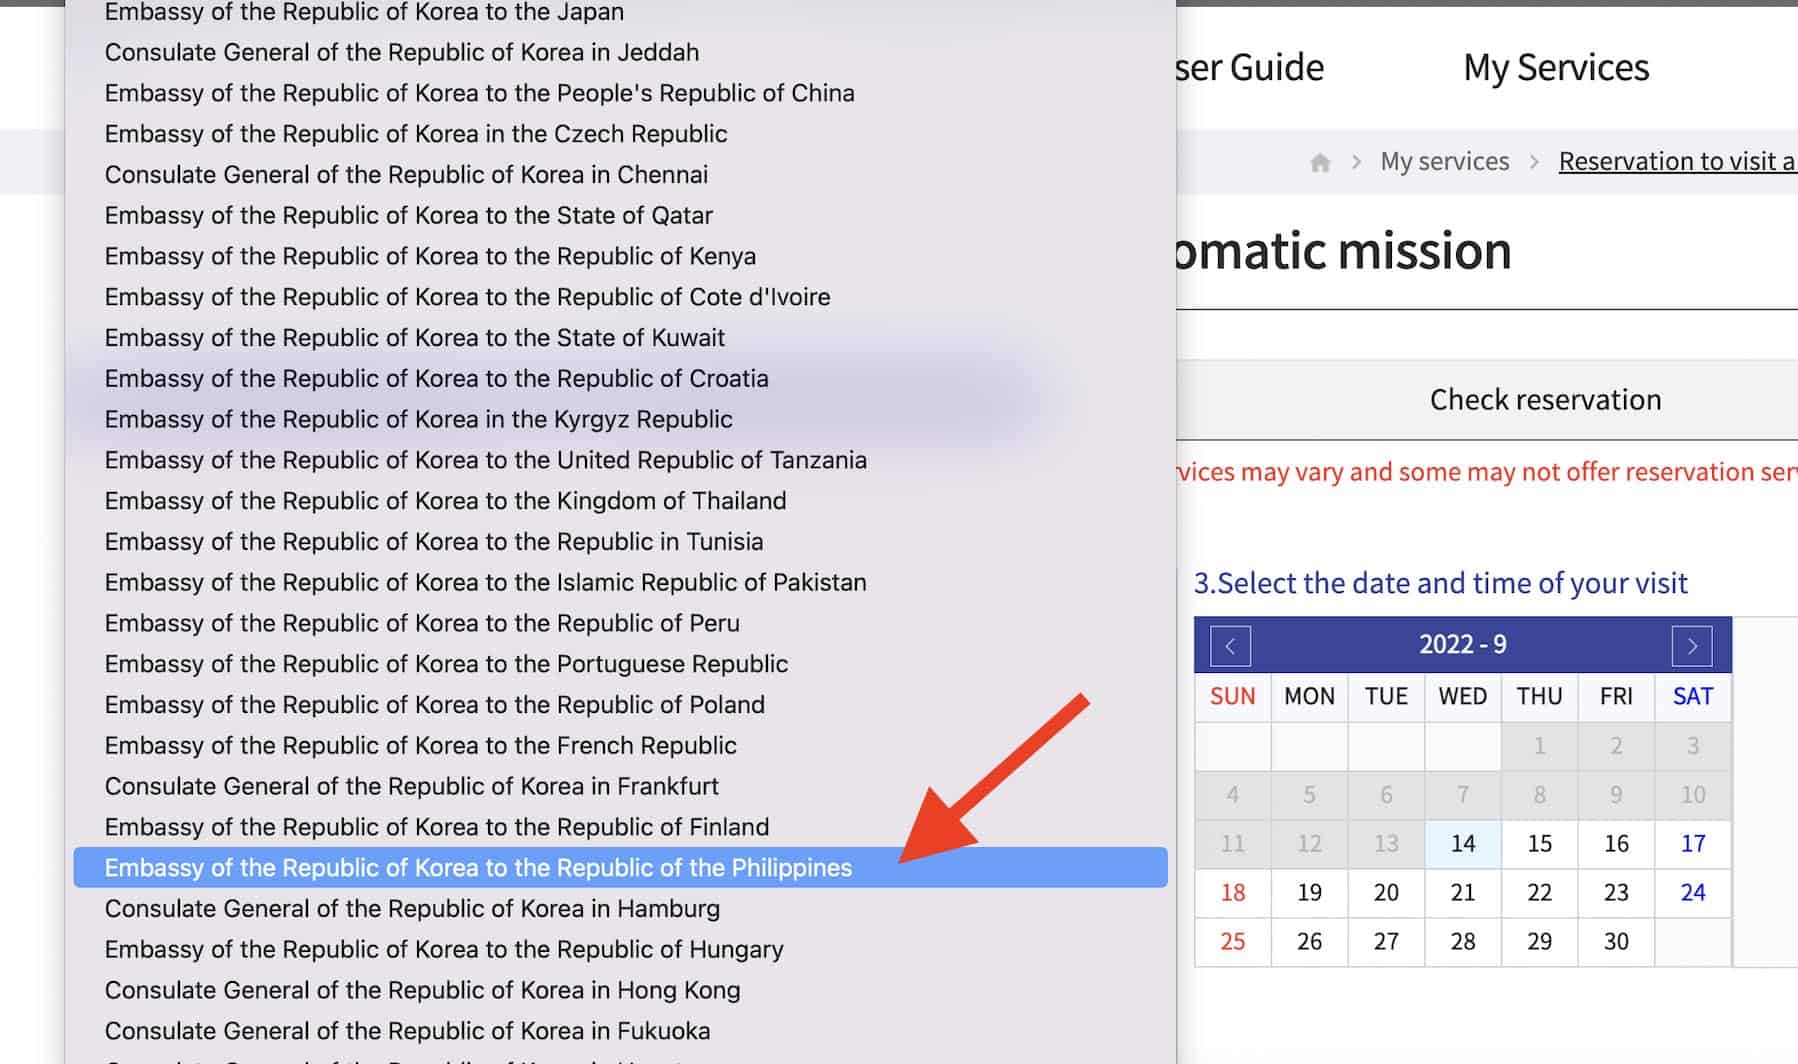
- Under SELECT A DIPLOMATIC MISSION, choose EMBASSY OF THE REPUBLIC OF KOREA TO THE REPUBLIC OF THE PHILIPPINES. This is the Korean Embassy in Manila. (It’s toward the bottom of the list.) Note that there are two Philippine missions on the list. The other is the Consulate General in Cebu. Make sure you pick the right one.
- Under SELECT A CONSULAR SERVICE, choose VISA (INDIVIDUAL APPLICANTS FOR TOURISM). And then, under it, tick the box next to VISA (INDIVIDUAL APPLICANTS FOR TOURISM). It’s the only selectable box.
4. Select an appointment date.
You’ll see that not all dates are clickable. The grayed out dates cannot be chosen. Pick a date.
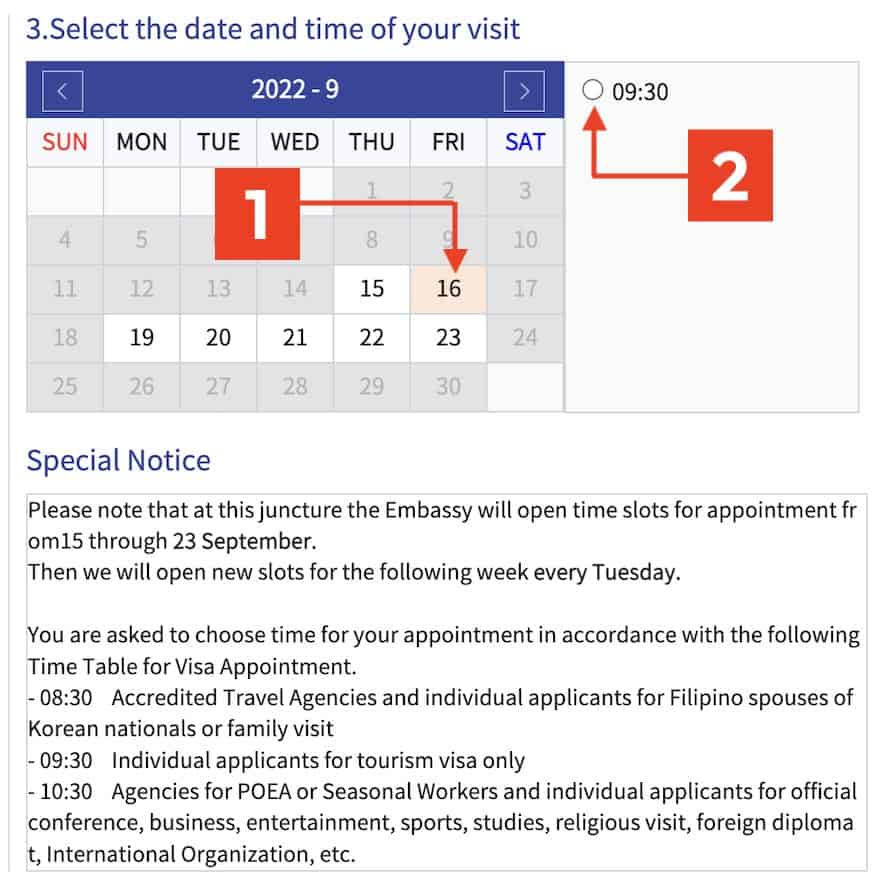
After you pick a date, click the radio button beside 09:30. This is the only available time of submission for tourist visa applicants. These are the time allocations:
- 08:30 AM – accredited travel agencies and individual applicants for family visit and Filipino spouses of Korean nationals
- 09:30 AM – individual applicants for tourism visa only
- 10:30 AM – agencies for PEA or seasonal workers and individual applicants for official conference, entertainment, sports, business, studies, religious visit, foreign diplomat, international organization, etc.
Even though it’s the only option, don’t forget to still tick 09:30. You won’t be able to move on to the next step otherwise.
If all dates are grayed out and not clickable, it means there are no more available slots at the time. You can wait and keep on refreshing.
NOTE: The Embassy only opens slots for the coming two week every other THURSDAY. That’s the best time to try to get an appointment. However, this doesn’t mean that you won’t be able to find a slot any other day. Sometimes, the Embassy or the applicant themselves cancel their appointment, putting refreshed slots up for grabs.
5. Check reservation details and type your passport number.
‼️ Under SPECIFIC REQUESTS, enter your passport number! If you’re also applying for your parents/children/spouse under this appointment, you should enter all your full names and corresponding passport numbers.
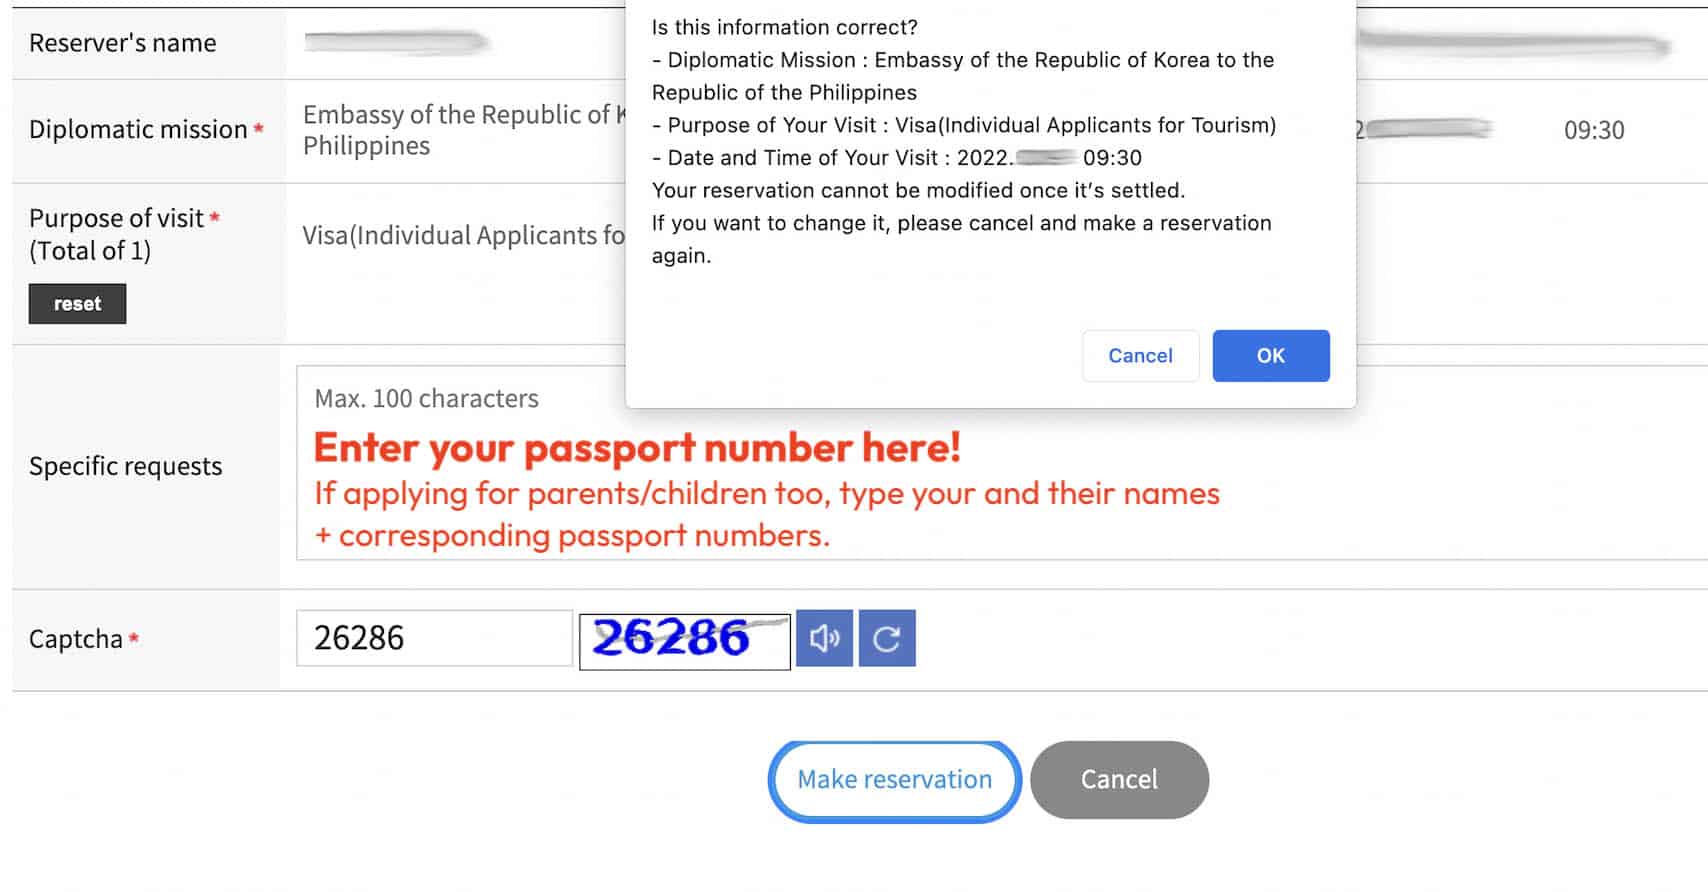
If you don’t fill in the SPECIFIC REQUESTS field, the Embassy will automatically cancel your appointment and you’ll have to find a new slot. I learned this the hard way, so don’t make the same mistake.
Once everything is in order, type in the CAPTCHA code and click MAKE RESERVATION.
A note will pop up. Check if all the details are correct. You won’t be able to modify it afterwards. If you need to change something, you’ll have to cancel and make another reservation. If everything is correct, click OK.
6. Print out your Reservation Confirmation.
You’ll be taken back to the RESERVATION page, which will now display your scheduled appointment. On the far right, under RESERVATION RECEIPT, click PRINT.
It looks like this:
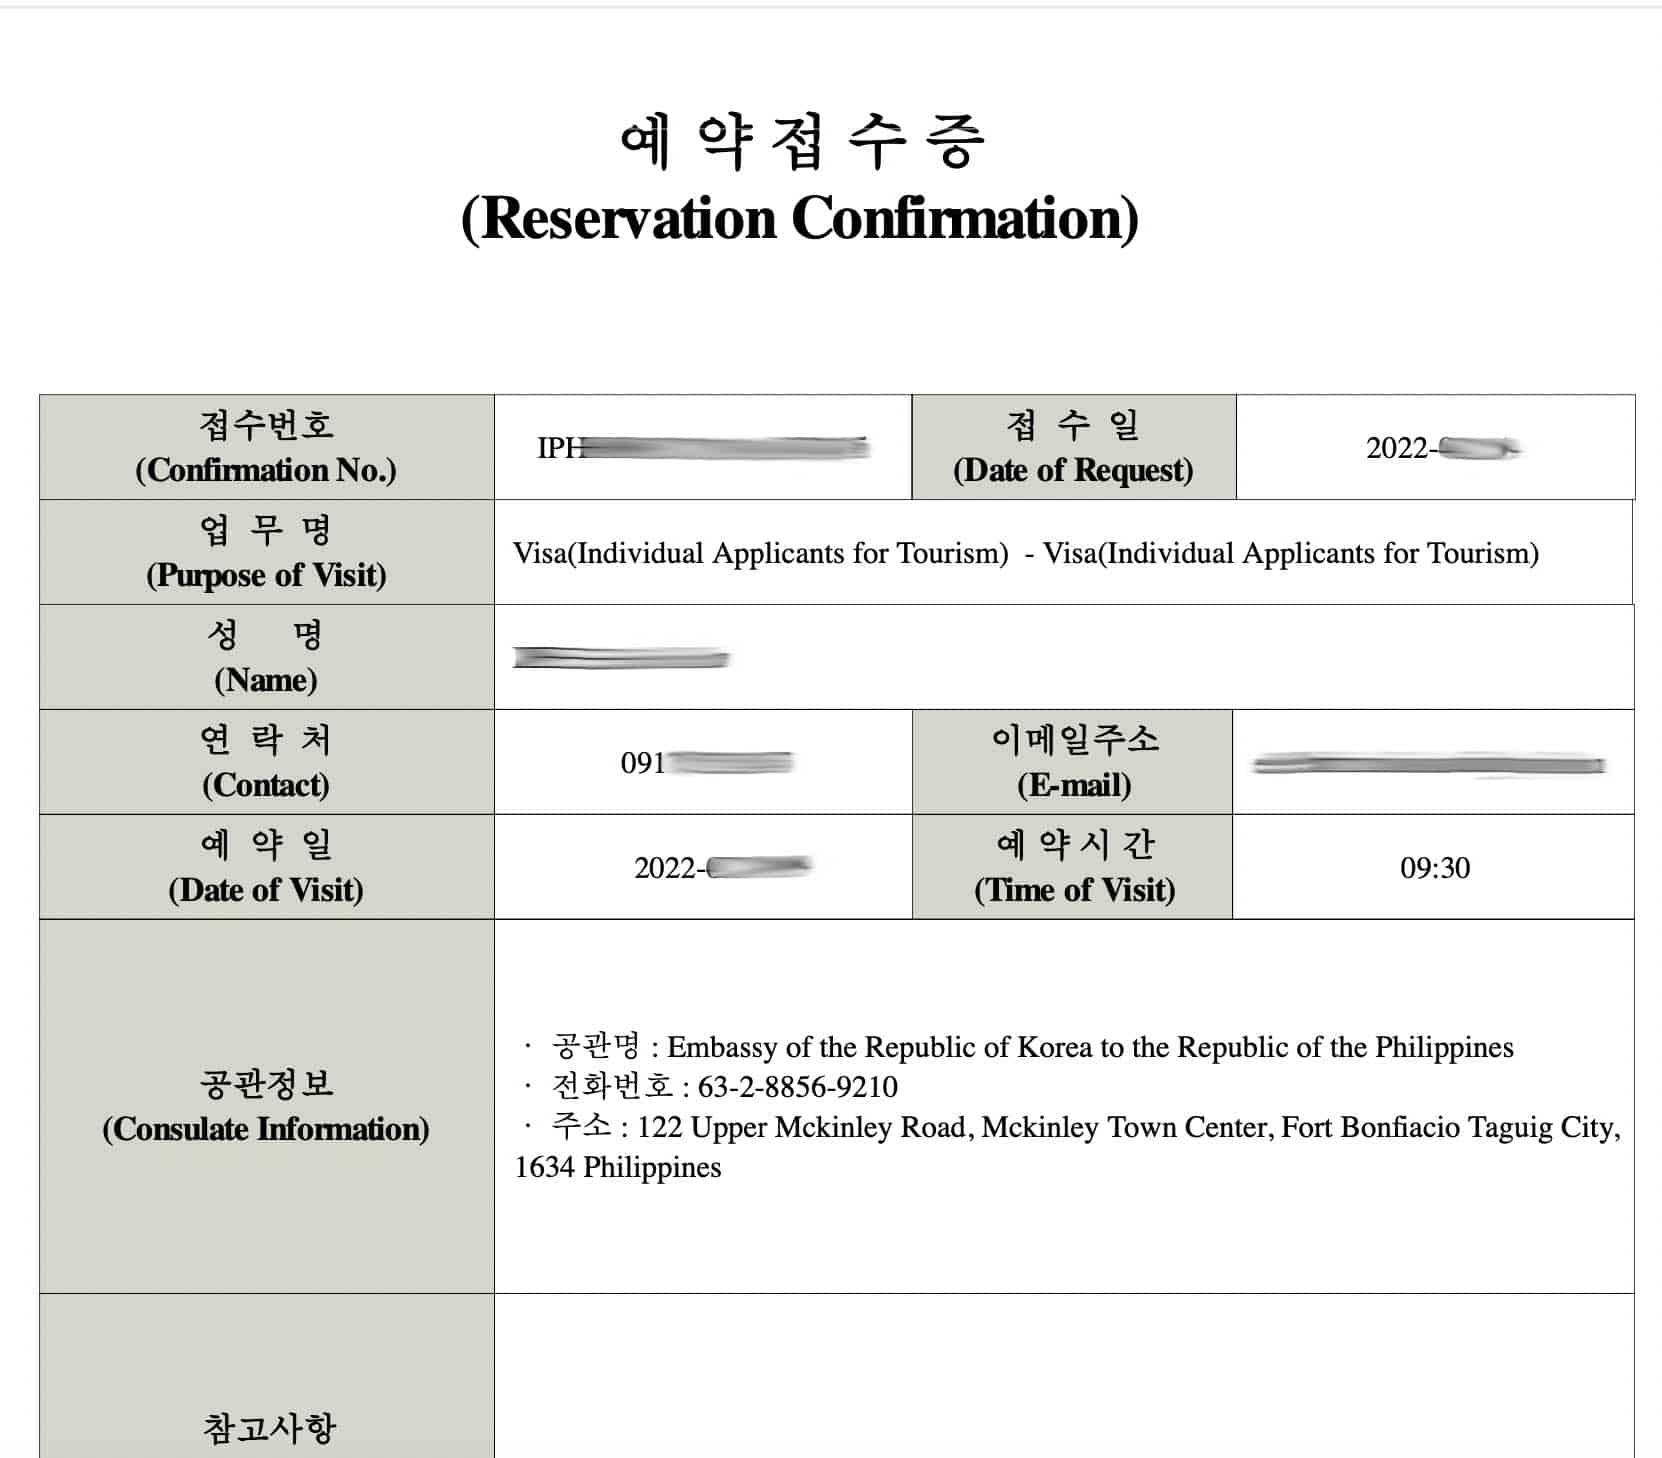
‼️ IMPORTANT! Do not forget to print or save a copy of this receipt. They will check it when you visit the Embassy on your appointment date. Without it, you’ll be denied entry to the premises.
You’ll also receive a confirmation via email.
7. Show up at the Embassy on scheduled appointment date and time.
Bring the following:
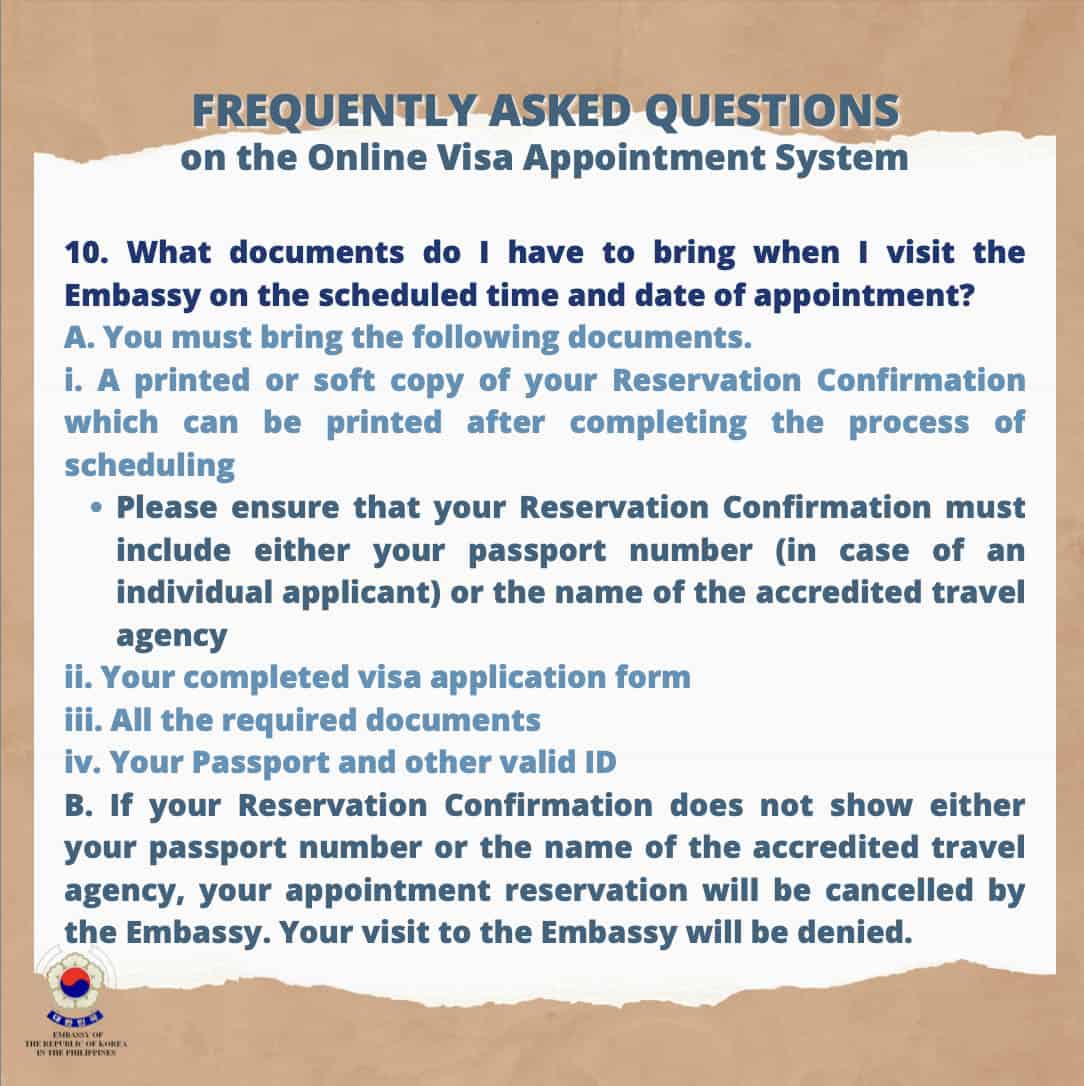
- a printed or soft copy of your Reservation Confirmation
- Completed visa application form
- Passport and identification card
- All the other required documents
‼️ IMPORTANT! Only the visa applicants themselves whose names and passport numbers are indicated on the Reservation Receipt will be allowed to enter the Embassy. If you’re caught applying for someone other than yourself, your parents, your children or your spouse, you will be blacklisted by the Embassy.